OAuth 2.0: Fundamental Concepts, Terminology, and Authorization Flows

In modern web applications, it is critically important for different services and systems to communicate with each other securely. While using a service, there may be situations where, after logging into the relevant system, we also need to access data in another system. Let us imagine that we have a company offering an online photo printing service; after our customers log into our system, they may want to access their photos on Google Drive to select which ones to print. In such scenarios, the OAuth 2.0 protocol emerges as an auxiliary protocol.
OAuth 2.0 is a standard designed for inter-service authorization. In this article, we will examine in detail the fundamental concepts of OAuth 2.0 and its important authorization flows.
What is OAuth 2.0?
The word "Auth" in OAuth is often confused with authentication, but here "auth" means authorization. OAuth 2.0 is designed to allow one service to grant access to another service—it is not used for a user to authenticate their identity.
OAuth was originally created not for a service to authorize a person, but for a service to authorize another service. So why would one service authorize another? Let us explain the answer to this question with a classic example.
OAuth through the Photo Printing System Analogy
Let us consider a website offering a photo printing service.
Users can place print orders by uploading photos to the system. However, having each user upload their photos one by one from their computer both makes the user experience difficult, increases infrastructure costs, and creates security risks.
Today, most users no longer store their photos on local computers, but rather on cloud services like Google Drive. At this point, the user asks the following question:
“Can I import my photos from Google Drive directly?”
Such a feature would provide great convenience for the user. However, there is a critical problem here:
The files on Google Drive are protected by Google, and accessing these files requires Google authentication.
So how can our website access the user's photos on Google Drive on behalf of the user, without asking for the user's Google username and password?
Incorrect Approach: Requesting User Credentials
In theory: we might think that we can accomplish this process by asking the user for their Google ID and password. However, considering that users will not share such secret information, we can easily say that this idea cannot go beyond theory.
Valet - Key Analogy
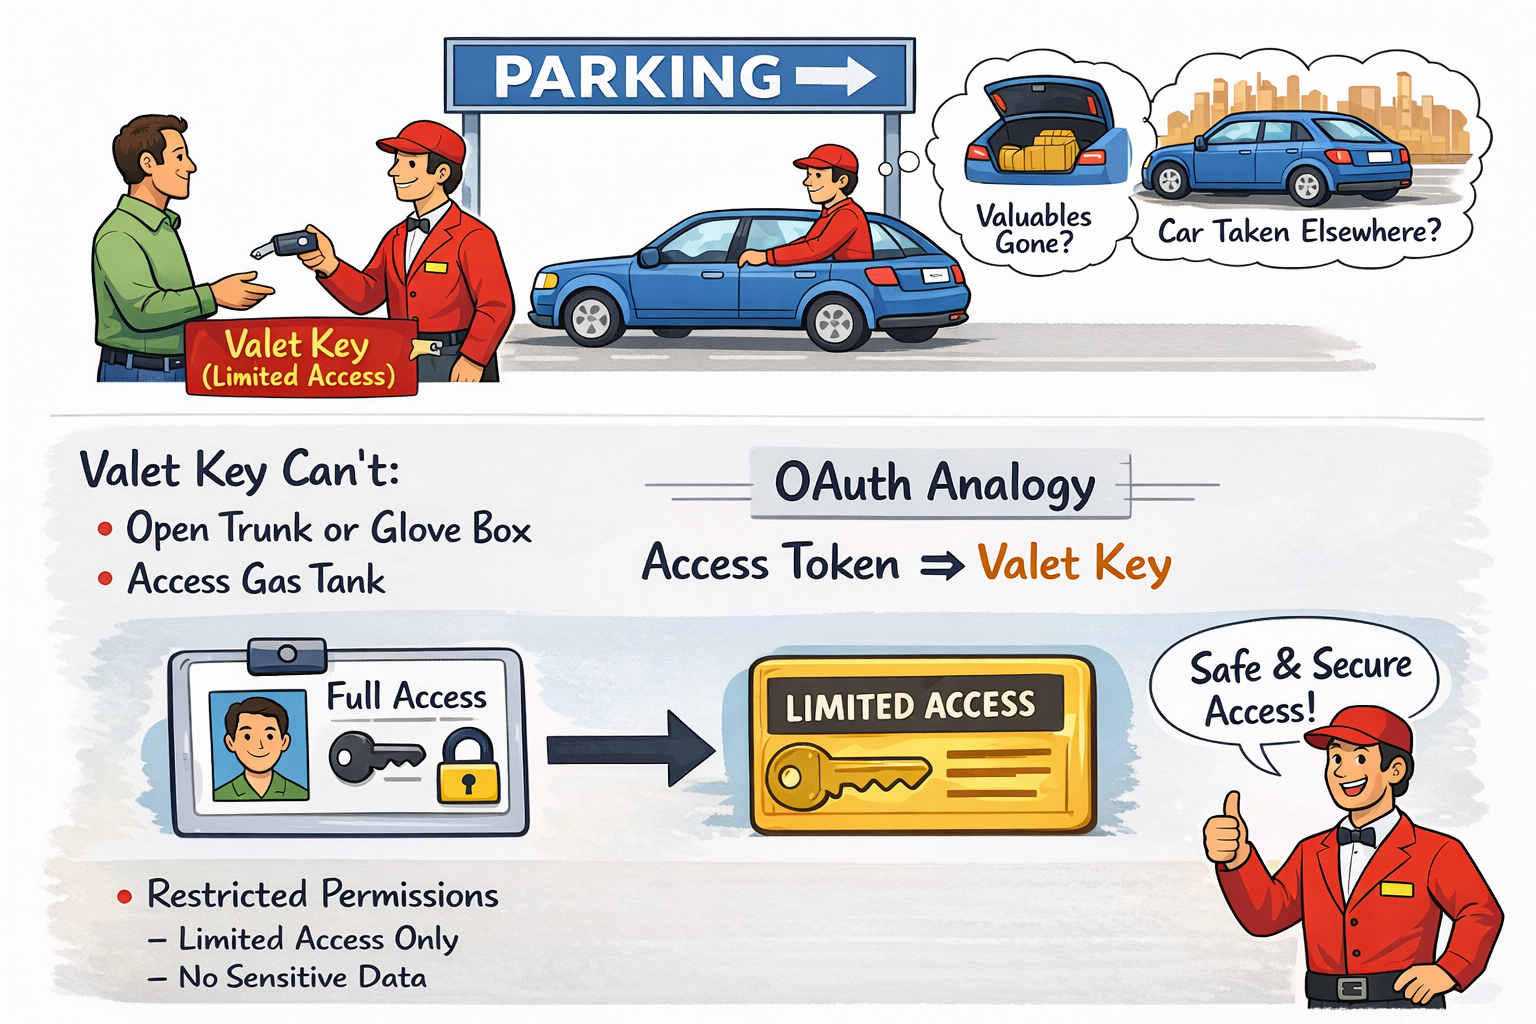
There is a very common analogy used to understand OAuth: the valet - key model. A car owner arrives at the parking lot, gets out of the car, and gives the key to the valet, asking them to park the car. The valet takes the key, drives the car to the parking spot, and parks it.
However, some car owners may have concerns when handing over the key to the valet. :) They may worry that a valuable item placed in the trunk or glove compartment could be taken, or that the car could be driven elsewhere...
Some cars come with an additional key for such situations: a valet key. The valet key is like the main car key but has limited access:
• It can start and stop the car
• It cannot open the trunk or glove compartment
• It cannot open the fuel tank
If the car owner has such a key, they feel more comfortable giving it to the valet, knowing that the valet cannot do anything outside the intended purpose with this key.
OAuth works in this way: instead of full credentials, the relevant system is given a 'valet key' (access token) that provides limited access.
How Does OAuth 2.0 Work?
In a web application offering a photo printing service, allowing users to directly access images in their Google Drive accounts provides significant ease of use. However, this scenario introduces a security problem:
Even if the user is logged into both the photo printing service and their Google account, these two systems do not directly trust each other. Each system only recognizes and authenticates the user; for a third-party service to act on behalf of the user, an additional authorization mechanism is required.
At this point, it is not sufficient for the photo printing service to directly request Google for access to the user's files. From Google's perspective, this request is considered an unverified third-party request and is rejected. Google only accepts operations based on the explicit consent of the user when it comes to accessing user data.
The OAuth protocol is designed to solve this security problem. In a system using OAuth, third-party services (in this example, the photo printing service) do not directly request data on behalf of the user; instead, they redirect the authorization process to the user.
The following steps occur in this flow:
1-The photo printing service notifies Google that it wants to access the user's files.
2-Instead of accepting this request directly, Google redirects the user to an authorization screen.
On this screen, the user is clearly presented with:
Which service is requesting access,
What types of permissions are being requested (for example, read-only access),
For what purpose this access will be used
3-If the user approves the request, Google generates an access token for this service.
This access token is considered a credential with limited permissions in the context of OAuth. Full user credentials are not shared; instead, only a temporary authority that can operate within the scope approved by the user is granted. This structure, as in the valet key analogy, restricts access to only the necessary functions.
In the following steps, the photo printing service uses this access token in every request it makes to the Google Drive API. Google verifies the token in the incoming request; if the token is valid and the scope of authority is appropriate, access to the relevant resource is granted. Otherwise, access is denied.
Thanks to this approach:
User passwords are not shared with third-party services,
The scope of access is clearly limited,
The user retains full control over their data.
OAuth 2.0 Terminology
Let us continue to explain the basic terminology you will encounter in OAuth implementations, articles, and documentation through our analogy;
1. Resource
The resource is what all actors in the OAuth flow are trying to access. It is also called the protected resource. In our example, what is the resource? The photos on Google Drive. The entire purpose of the OAuth flow is to provide access to this resource.
2. Resource Owner
The Resource Owner is the person who currently has access to the resource—in other words, the user. The definition in the OAuth specification: "An entity capable of granting access to a protected resource." In the photo printing service example, the service needs access to the resource, and in this case, the access can be granted by the Resource Owner, i.e., the person whose photos are on Google Drive.
3. Resource Server
The Resource Server is the server that hosts the protected resource. In our example, Google Drive is the resource server. The resource server hosts and manages the protected resource.
4. Client
The Client is the application that needs to access the protected resource. It is the application that makes requests to the protected resource on behalf of and with the authorization of the resource owner.
In our example:
• User (the person at the laptop) = Resource Owner
• Google Drive = Resource Server
• Photo printing service = Client
5. Authorization Server (Authorization Server)
The security responsibility lies with the resource server. The resource server is responsible for ensuring the security of the resource. Therefore, the resource server usually comes with an Authorization Server. The authorization server is responsible for ensuring that everyone accessing the resource is authorized. The Authorization Server is the server that issues access tokens to the client.
Note: The Resource Server and Authorization Server can be the same server or separate servers. The specification does not provide detailed information on this, but conceptually they can be considered as two separate areas of responsibility.
OAuth 2.0 Flows
There are flows and implementations designed for OAuth. In this section, we will examine three important flows you need to know.
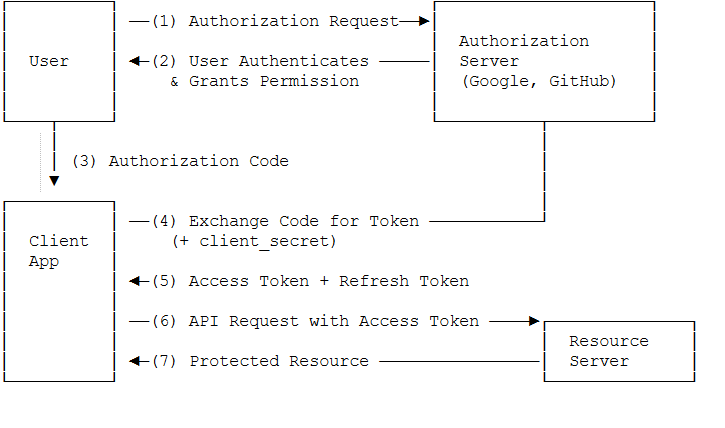
1. Authorization Code Flow
This is the most secure and most recommended OAuth flow. It occurs between the resource owner, client, and authorization server.
The user initiates an action in the client application such as “Sign in with my Google account” / “grant access to my account”.
The client redirects the user to the Authorization Server (usually via browser redirect).
The Authorization Server authenticates the user (shows a login screen) and displays which permissions (scope) are requested.
The user approves the permissions (Consent screen).
The Authorization Server gives the client an authorization code (single-use, short-lived code) → sends it back to the client via redirect_uri.
The client receives this authorization code and makes a request to the Authorization Server in the background (backend-to-backend):
code + client_id + client_secret + redirect_uri
The Authorization Server verifies the code and gives the client the following pair:
access_token (short-lived, used for resource access)
refresh_token (optional, long-lived; used to refresh the access token)
The client now uses the access_token to make requests to the Resource Server (e.g., Google API, Drive, Gmail, etc.).
The Resource Server verifies the token and returns the requested resource (data).
Why is it considered the most secure?
The authorization code does not circulate openly in the browser. The access token and especially the client_secret are used only in the backend. Long-term access can be managed securely with the refresh token.
2. Implicit Flow
The Implicit Flow is similar to the Authorization Code Flow but is somewhat simplified.
The flow works as follows:
Steps 1-4: The first four steps are the same as the Authorization Code Flow. The user makes a request, the client goes to the authorization server, the authorization server obtains user consent.
Step 5: Instead of giving an authorization token and waiting for the client to exchange it for an access token, the authorization server sends the access token directly.
Steps 6-7: The client directly calls the resource server with this access token and obtains the resource.
This flow has a disadvantage: The access token is the only thing needed to access the resource. If someone obtains the access token, they can act as the service and access the resource.
In the Authorization Code Flow, the access token can be exchanged more securely, so it is safer.
Implicit Flow is used in the following situations
:• JavaScript applications (running in the browser)
• When the access token is not expected to be very secure (will be stored in the browser)
• When simple and fast integration is required
In this flow, access tokens should be short-lived.
Implicit Flow is no longer recommended. In modern applications, it is advised to use Authorization Code Flow with PKCE.
3. Client Credentials Flow
This flow is a suitable usage flow for microservices. It is generally used when the client is trusted.
Example: Suppose we have two microservices. Microservice 1 wants to call an API in Microservice 2. Microservice 2 has access to the database. When Microservice 1 calls Microservice 2, it should only be able to access certain APIs, not other APIs and data.
The Client Credentials Flow works as follows:
Step 1: Microservice 1 wants to call an API in Microservice 2.
Step 2: It first makes a call to the OAuth server and provides a special client ID (identifies itself):
Step 3: The OAuth microservice authenticates and prepares the access token required for access to specific resources.
Step 4: Microservice 1 stores this token.
Step 5: Microservice 1 calls Microservice 2. Microservice 2 checks the token.
Step 6: If Microservice 1 tries to access a resource for which the token does not have permission, this request is denied.
Client Credentials Flow is generally preferred for service-to-service authorization in microservice architectures. It ensures that each microservice can access only the data it needs.
4. PKCE Flow (Proof Key for Code Exchange)
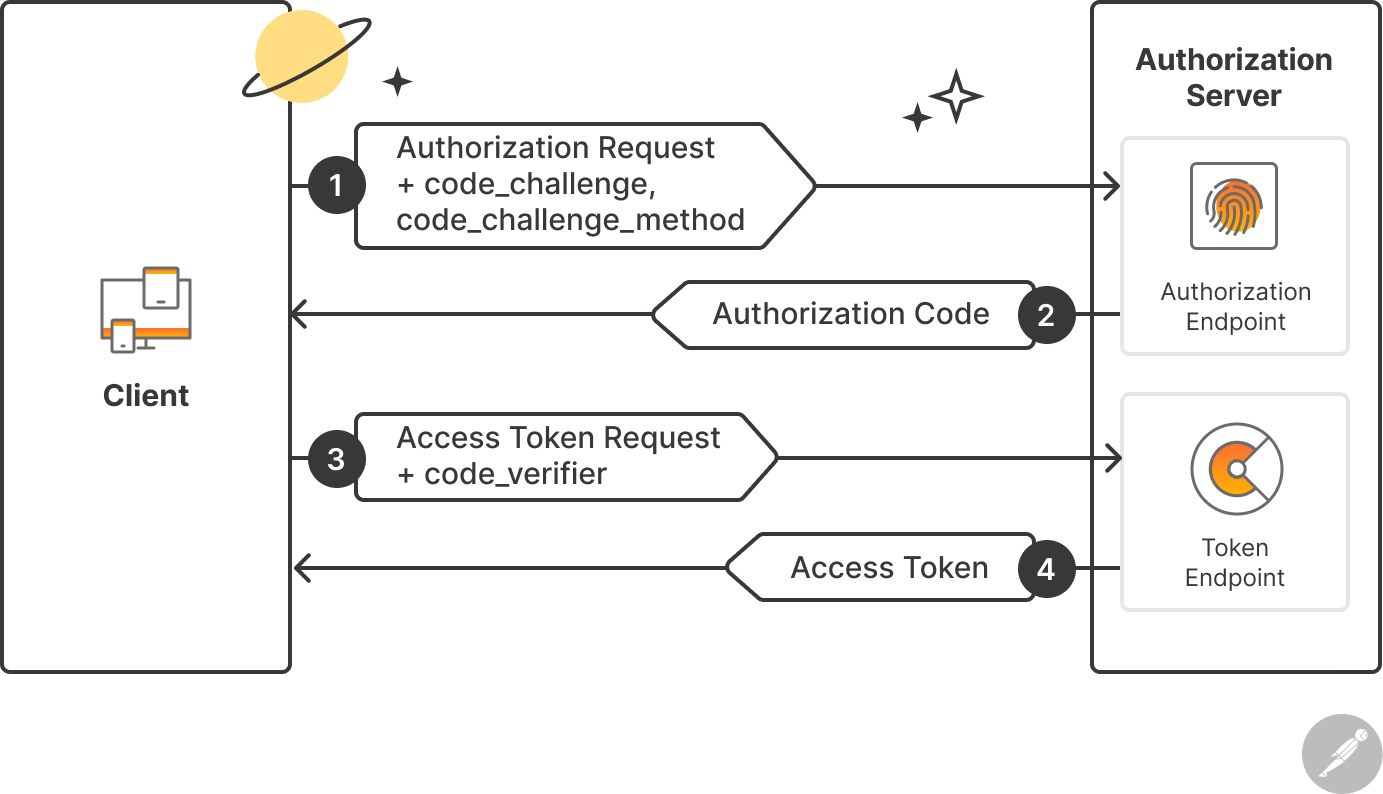
PKCE is an extension of the Authorization Code Flow. It is especially designed for mobile applications and Single Page Applications (SPA). It has replaced the Implicit Flow.
The basic flow of PKCE can be summarized as follows:
1. The client generates a random "code verifier"
2. It sends the hash of this verifier (code challenge) to the authorization server
3. When the authorization code is received, it also sends the original verifier
4. The server verifies that the hash of the verifier matches the previous challenge
In this way, even if the authorization code is intercepted, the access token cannot be obtained without the code verifier.
Access Token Format: JWT
Access tokens must fully contain the granted permissions. They must also be verifiable. Today, the most commonly used access token type is JWT (JSON Web Token). JWT is widely used as the access token format in OAuth 2.0.
JWT consists of three parts:
1. Header: Contains the token type and signing algorithm.
2. Payload: Contains user information and permissions.
3. Signature: Contains a signature that verifies the token has not been altered.
Example of a JWT token structure: eyJhbGciOiJIUzI1NiIsInR5cCI6IkpXVCJ9.eyJzdWIiOiIxMjM0NTY3ODkwIiwibmFtZSI6IkpvaG4gRG9lIn0.SflKxwRJSMeKKF2QT4fwpMeJf36POk6yJV_adQssw5c
Advantages of OAuth 2.0
Delegated Access: Enables inter-service access without sharing user credentials.
Open Standard: All services on the internet follow the same set of rules to communicate with each other.
Limited Access: Like a "valet" key, only certain operations can be permitted.
Security: Access tokens can be short-lived and revoked when necessary.
User Control: The user can decide which permissions to grant.
Scope-Based Permissions: Different levels of access permissions can be defined.
Security Considerations
Security points to consider when using OAuth 2.0:
1. State Parameter: Provides protection against CSRF attacks. A unique state value should be sent with each authorization request and verified in the callback
2. HTTPS Requirement: The OAuth flow must always occur over HTTPS. Tokens can be intercepted over HTTP
3. Token Storage: Access tokens must be stored securely. httpOnly cookies should be preferred over localStorage in the browser.
4. Token Lifetime: Access tokens should be short-lived (such as 1 hour) and refreshed with refresh tokens.
5. Scope Minimization: Only the necessary permissions should be requested.
Conclusion
OAuth 2.0 is an indispensable standard for secure inter-service authorization in modern web applications. Valet keyas in the key analogy, instead of sharing full identity information, it uses tokens that provide limited access.
• Resource: The resource to be accessed
• Resource Owner: The owner of the resource (user)
• Resource Server: The server hosting the resource
• Client: The application requesting access to the resource
• Authorization Server: The server issuing the tokens
We examined four important flows:
1. Authorization Code Flow: The most secure, recommended flow
2. Implicit Flow: Old method, no longer recommended
3. Client Credentials Flow: Ideal flow for microservices
4. PKCE Flow: Secure flow for mobile and SPA applications
Thank you for taking the time to read this article.
I hope the content is useful. Don't forget to visit celsushub for new articles.
Sources:
What is OAuth really all about - OAuth tutorial - Java Brains -> https://www.youtube.com/watch?v=t4-416mg6iU
OAuth terminologies and flows explained - OAuth tutorial - Java Brains-> https://www.youtube.com/watch?v=3pZ3Nh8tgTE